

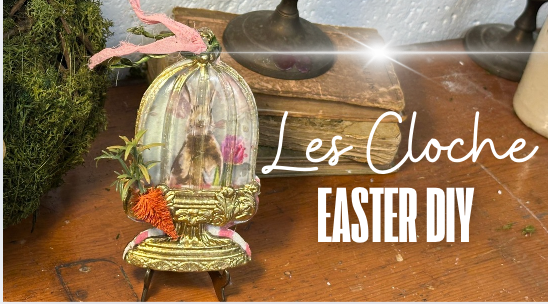
Easter DIY using the Le Cloches Mould by IOD, Mr. Cottontail & Cottontail Background rice paper by Decoupage Queen, and various Pentart Products.
Spring DIY: Transforming a Bunny Decoupage Cloche with Shimmer and Style
Ready to create a spring-inspired masterpiece that will make your Easter décor pop? Let’s dive into a charming bunny cloche DIY using decoupage, shimmer, and a touch of creativity. Follow this step-by-step guide and see how small details can make a big impact!
Materials You’ll Need:
- MDF backing (custom-made for IOD cloche molds)
- Decoupage paper (I used Mr. Cottontail and Cottontail Background by Decoupage Queen with coordinating stripes)
- Pentart Acrylic Primer
- Decoupage varnish and glue (Silky Shine)
- Pentart Mica powders and Pigment fix (Peach Rose, Pearl White & Golden Brown)
- Metal Pigment in Gold
- Pentart Pouring Glaze
- Pentart Wax pastes (Magenta, Rose Gold, Green)
- Sparkling Gel in Transparent Silver
- Fine paintbrushes
- Sandpaper
- Scissors
- HERE
Step 1: Prepping the Base For a Perfect Finish
Start with an MDF backing custom-made for the cloche mold. To make your crafting easier (and cleaner), tape down the small MDF piece. This keeps it secure while you work without turning your fingers into a gluey mess.
Apply two coats of Pentart Acrylic Primer for a smooth foundation. If you’re curious about Pentart primers, check out my Pentart Playbook for tips on bonding primers, primer pastes, and more!

Step 2: Choosing and Cutting the Design
Decide which part of the Bunny decoupage paper you want to showcase. Position the cloche over the paper to visualize the design, then trace and cut out the section you need. Don’t worry about perfection—any rough edges can be cleaned up later with sandpaper.

Step 3: Decoupage the Bunny
Using Pentart Silky Shine Decoupage Varnish and Glue, adhere the bunny paper to the MDF backing. Smooth out any wrinkles with saran wrap for a smooth finish, and let it dry before moving on.

Step 4: Adding Shimmer and Depth
Here’s where the fun begins! Use pigment fix and mica powders to highlight the design. I started with the Peach Rose mica,a pink shimmer, on the striped areas, which deepened the colors beautifully. Then, I layered Pentart Sparkling Gel in transparent silver to add a subtle glow to the white stripes.
For the bunny itself, I highlighted darker areas with brown mica powder and used a very fine brush to ensure the details stayed crisp. For the lighter parts of the bunny, like its nose and chest, I mixed peral white pigment to give a soft, natural look. Don’t forget to highlight defining areas, like the bunny’s ears, so they don’t blend into the background.


Step 5: Enhancing the Floral Details
To make the flowers pop, I used magenta wax paste on flower, rose gold wax paste on the petals in the background and green on the stems. Wax pastes add a beautiful sheen without overwhelming the original design. Lightly brush darker areas for depth and use a soft touch on lighter spots to maintain balance.

Step 6: Making the Cloche Shiny and See Through
To get rid of the cloudy and milky look on the resin, I used Pentart Pouring Glaze to bring it to life. You can also use Pentart Glossy Varnish. If you skip this step, your cloche will remain cloudy and it will make it hard to see through the resin.


Step 7: Assembling the Cloche
Once everything is dry and shimmering, glue the decorated MDF backing onto the cloche. Admire the way the shimmer catches the light—it’s subtle but magical. Your bunny cloche is now ready to display!

Step 7: Mixing Gold Metal Pigment
Mix pigment fix and gold metal pigment. Once mixed well, add to the base of the cloche. Go lighter on the area where the bunny will show through and heavier on the base.


Step 8: Creating the Carrot
This step adds a playful touch to the project! Take a bottle brush tree and transform it into an adorable carrot. Paint it orange with watered dcown acrylic paint and let it dry completely. Once dry, hot glue some plastic looking greenery to the top of the carrot.
Position the carrot alongside the bunny within the cloche for a whimsical springtime scene.


Step 9: Add Ribbon to the Cloche
Use some leafy ribbon and pink ribbon to add the finishing touch to it.

Tips for Success:
- Use fine brushes for detailed work; trust me, it makes all the difference.
- Don’t fear experimenting! If you make a mistake, layer another color on top to fix it.
- Tape down your small pieces and use wax paper to keep your workspace tidy.
Final Touches
Your bunny cloche is more than just an Easter decoration—it’s a conversation starter! Place it on a shelf or table to bring a touch of spring charm to your home. And if you love shimmer as much as I do, don’t hesitate to add more sparkling gel or wax pastes to future projects.
All products can be purchased HERE
Love This DIY?
Please leave me a comment below.
Share:
Pentart Primer Comparison
Pentart Acrylic Paints: Matte and Metallic
1 comment
Самый быстрый и безопасный сервис обмена электронных денег ждет вас на BestChange.ru. Если вы фрилансер, веб-мастер, получаете деньги за услуги и постоянно имеете дело с электронной валютой в сети, то пользоваться традиционными сервисами не всегда удобно. Гораздо приятнее иметь дело с обменными пунктами, где меньше ограничений, лучше курсовая разница, скидки на тарифы для постоянных клиентов. Согласны? На BestChange представлены именно такие обменные пункты, «заточенные» под завсегдатаев Интернета, обладающие безупречной репутацией, решающие любые вопросы на раз-два-три.
Проходите по ссылке — более 500 проверенных обменных онлайн-сервисов в одном месте — BestChange.ru