

DIY Antique Frame Dupe Inspired by the Louvre and Versailles in Paris.
✅ Step-by-Step Tutorial for an Antique Frame DIY
Have you ever been inspired by something so unique that it stays with you? That’s exactly what happened to me on my recent trip to Paris, France, and Florence, Italy. While exploring the Louvre and Versailles, I found myself captivated by the antique frames more than the artwork itself (is that weird?). The intricate details, the variety of designs, and the craftsmanship of those frames were simply breathtaking. So, I decided to recreate that old-world charm in my own home by making an antique frame dupe for my gallery wall. Here’s how I did it!
Materials I Used:
- Art Canvas (remove the canvas to use the wood frame underneath)
- IOD Air Dry Clay
- IOD Trimmings 4 Mould
- Pentart Heavy Body Gel (for adhering the clay pieces)
- Fusion Gold Metallic Paint
- IOD Classic Elements Mould
- Amy Howard Dust of the Ages (for aging details)
- Dixie Belle Dark Wax
- Double-Sided Tape
- Staple Gun
- Picture Hanger
- Scissors
- Paint Brush
- Palette Knife
Step-by-Step Tutorial:
Step 1: Preparing the Frame
I started with a art canvas from the craft store. To prepare it, I carefully removed the canvas material, removed staples leaving only the wooden frame underneath. This wooden base is perfect for creating an antique frame look.

Step 2: Casting the Moulds
Using the IOD Trimmings 4 Mould and air dry clay, I cast several detailed trim pieces. The mould is ideal for recreating the intricate carvings you’d find on antique frames. I pressed the clay into the mould, smoothed it out with a palette knife, and gently released the pieces.


Step 3: Attaching the Trim
Once the clay pieces were ready, I adhered them to the frame using Pentart Heavy Body Gel. The gel provides a strong bond and ensures the pieces stay in place. I arranged the trims to fit the frame perfectly, trimming any excess with scissors.

Step 4: Adding Extra Details
To elevate the look, I used the IOD Classic Elements Mould to add decorative touches. These additional elements gave the frame more depth and authenticity, mimicking the variety of designs I saw on antique frames in Paris.


Step 5: Painting the Frame
After the clay had dried and everything was secured, I painted the entire frame with Fusion Gold Metallic Paint. The gold finish provided the perfect base for that antique look.

Step 6: Antiquing the Frame
To bring out the details and give the frame an aged look, I applied Dixie Belle Dark Wax, focusing on the crevices. I followed up with Amy Howard’s Dust of the Ages, which settled beautifully into the intricate designs, adding even more character.


Step 7: Adding the Artwork and Finishing Touches
Once the frame was dry, I attached a thrifted painting I found at an estate sale. To secure it, I used double-sided tape and a staple gun. Finally, I added a picture hanger to the back so it’s ready to hang on my wall.

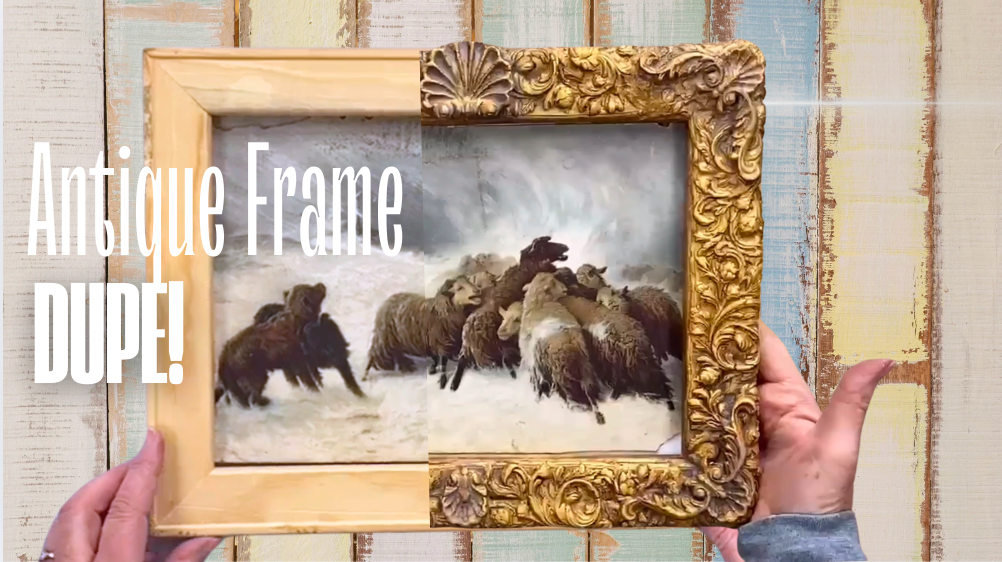
The Big Reveal
This DIY project was a labor of love, inspired by the antique frames I fell in love with during my travels. The finished frame now hangs proudly on my gallery wall in my cozy bedroom escape nook. Every time I look at it, I’m reminded of the beauty of Paris and Versailles and how creativity can bring a piece of history into your home.

Tips for Your Own DIY Antique Frame
- Don’t rush the moulding process! Let the clay dry completely before painting.
- Play around with different wax and dust combinations to find the perfect aged look.
- Be creative with your mould placement—layering details can make a big difference.
Final Thoughts
I hope this project inspires you to look at antique frames in a new way and maybe even create one of your own. Whether it’s for a gallery wall, a statement piece, or a gift, there’s something special about bringing old-world charm into your home.

If you try this project, I’d love to see your results! Share your creations with me on Instagram or in the comments below. Happy creating!
Share:
Pentart Decoupage Varnish and Glue Matte and Silky Shine
DIY Classic Antique Brooches | IOD Vintage Brooches Mould